HOW DOES ARTIVIVE WORK?
Artivive uses augmented reality (AR) technology to add a digital layer to physical artworks and images. When you upload an image to Artivive Editor (Bridge), Artivive's creator platform, it analyzes the image to identify its unique visual pattern - like a fingerprint. When the image is scanned with the Artivive app or Artivive's WebAR Solution, it triggers the digital layers connected to it, such as videos, 3D models, animations, pictures or more. The digital layer appears overlaid on the physical artwork in real time through the camera view, blending the physical and digital worlds.
WHAT IS ARTIVIVE EDITOR (BRIDGE) AND HOW DO I USE IT?
Artivive Editor (Bridge) is our creator tool used to create AR experiences and bring your ideas to life. You first upload a trigger image - a picture of the physical artwork or design that the Artivive App or our WebAR solution will recognize - and then add digital layers to bring it to life in augmented reality (AR).
A variety of digital layers can be uploaded or selected from our library:
- Videos, animations, or GIFs
- Images
- 3D objects (also with an animation as a zip file)
- Audio files (songs, voiceovers, or similar)
- Particle effect layers
- Text layers
Once you added all the layers, you simply publish the artwork, and view it with the Artivive App or Artivive‘s WebAR Solution. No coding or technical background is required to create AR experiences with Artivive.
HOW CAN I REGISTER FOR AN ARTIVIVE EDITOR (BRIDGE) ACCOUNT?
To create an Artivive Editor (Bridge) account, visit the registration page and fill out the short sign-up form. You can also sign up using your Google, Facebook, Apple, or Clever account.
After registering, you will receive an activation email. Once your account is activated, you can log into Artivive Editor (Bridge) and start creating your first augmented reality project with Artivive. Find more information on the Artivive creator account and subscription options here.
HOW DO I CREATE MY FIRST AR PROJECT IN ARTIVIVE EDITOR (BRIDGE)?
Tap the "Create Artwork" button in the top right corner and you will enter the editor. Start by uploading a trigger image (JPG or PNG), which will later be recognized by the Artivive App/WebAR Solution and trigger the AR experience.
Then add your digital layers - video files, images, 3D objects, audios, effect, and text layers. Click "Publish" to create the augmented reality experience. Once processing is complete, the project will appear in your Artwork Collection and is ready to be scanned with the Artivive App or WebAR Solution.
WHAT IS A TRIGGER IMAGE?
A trigger image is the image that is recognized when scanned with the Artivive app or WebAR solution. It acts as the anchor for your AR experience — when a viewer points their camera at it, it activates the connected digital layers, such as videos, animations, 3D objects, audio, or other effects.
Your trigger image can be your digital artwork or a photo of your physical artwork, mural, merch design, or other visual.
When taking a photo, make sure your camera is pointed straight (not from an angle), and try to optimize the lighting conditions (no direct sunlight, not too dark) - this ensures better tracking.
WHAT FILE FORMATS AND SIZES ARE SUPPORTED IN ARTIVIVE EDITOR (BRIDGE)?
Artivive supports a range of file formats for both trigger images and digital layers. For a full overview of supported file types, size limits, and recommended specifications, visit our dedicated file types page.
WHAT DO THE STARS IN THE PROJECT INFO MEAN?
After you upload a trigger image, Artivive Editor (Bridge) analyzes it and rates its trackability on a scale of 0 to 5 stars. The rating reflects how easily the Artivive app can recognize the image. Images with high contrast and distinct detail score higher. Images that are very blurry, low in contrast, or close to a single solid color are harder to track and may not work reliably. If you're having trouble, contact Artivive support for assistance.
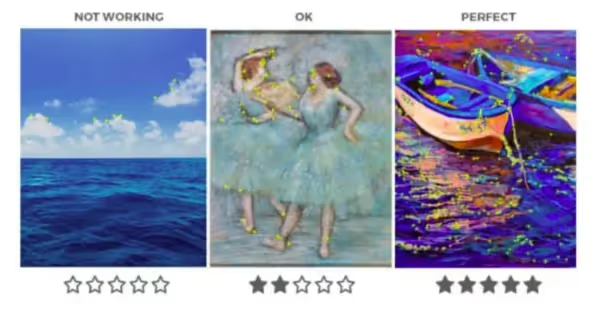
Find more information in our "How to optimize image recognition" guide.
CAN I EDIT OR UPDATE AN AR EXPERIENCE AFTER PUBLISHING?
Yes. In Artivive Editor (Bridge), click the three dots next to your artwork and select "Edit Artwork." After making your changes, click "Publish" to update the experience.
If your artwork is published via WebAR, editing it will not affect the QR code - it will remain the same. The QR code only disappears if you delete the artwork entirely.
DO I NEED CODING SKILLS TO CREATE AR EXPERIENCES WITH ARTIVIVE?
No. With Artivive, you can create augmented reality experiences without any coding or technical background using the Artivive Editor (Bridge).
CAN I ADD ADDITIONAL INFORMATION ABOUT MY ARTWORK FOR VIEWERS?
Yes. In Artivive Editor (Bridge), click the "Artwork Info" button to add your name, the artwork title, a short description, and your social media handles. This information is shown to viewers when they tap the "i" button inside the Artivive app.
HOW WILL MY AUDIENCE KNOW THAT THEY SHOULD USE ARTIVIVE?
Artivive provides ready-made templates with instructions that you can downloadand display alongside your physical artwork - for example, as a printed label, wall text, or poster. These guide viewers to download the Artivive app or scan the QR code to access the WebAR experience.
WHY DO SOME PROJECTS TAKE LONGER TO UPLOAD THAN OTHERS?
Depending on your location, internet connection, and the size of the video, or more added layers, it can sometimes take longer. We are constantly working on expanding our servers and network to give you the best experience.